The Lifecycle of a Phishing Campaign with Gophish
A phishing simulation campaign starts before the email is written and ends after the last click. It requires preparing the infrastructure, authenticating outgoing email, testing the participant journey, and turning the results into security improvements. We walk through that process: provisioning a VPS, installing Gophish, registering a domain, configuring DNS and email, creating the campaign, and closing the exercise. The context is a fictional, authorized awareness simulation modeled on a real engagement.
Contents
The written examples are fictional. The screenshots come from a real environment and are awaiting review and redaction before publication. example.org is a domain reserved for documentation, and 203.0.113.10 is a documentation IP address: neither can be used to deploy this infrastructure. Placeholders enclosed in <...> must be replaced with your own values; they are never ready-to-use keys.
1. Define the Exercise Before Provisioning Infrastructure
The first deliverable is a campaign brief: objectives, participants, dates, owners, the data to be collected, and stop conditions. It should also specify what the exercise will measure: technical controls, human behavior, or both.
For example, an exercise might measure how many participants report a suspicious message and how long the security team takes to respond. The click rate provides context, but it should not be the only metric.
Also agree on the scenario, sending volume, test mailboxes, and results retention. An awareness simulation can measure visits and interactions without requesting real passwords. That is the approach used in this walkthrough.
2. Understand What Each Component Does
It helps to separate five functions that are often confused during setup:
| Component | Role |
|---|---|
| VPS | Hosts Gophish and, if that architecture is chosen, the SMTP server. |
| Gophish | Manages templates, participants, campaigns, and events. |
| Domain and DNS | Associate names with services and publish authentication information. |
| SMTP | Transports messages, using either Postfix on the VPS or an external service. |
| SPF, DKIM, and DMARC | Allow receivers to check authorization and authentication for the sending domain. |
Pointing a domain at a VPS does not configure email. Website records and authentication records solve different problems. Gophish does not replace an SMTP server either: it needs one to send messages.
3. Provision and Prepare the VPS
Before purchasing, check that the provider permits authorized simulations, offers a maintained Linux distribution, and allows the required traffic. For direct delivery, pay particular attention to outbound TCP 25 and the ability to configure reverse DNS. If you plan to use an SMTP relay, check that service’s terms and ports.
Size CPU, memory, and storage according to volume and load testing. Include backups, storage, and the exercise’s duration in the budget, rather than only the advertised monthly price.
After creating the server:
- Connect over SSH, verifying the server’s identity and using your own key.
- Update the system and create an administrative account separate from the service account.
- Configure the firewall and confirm that SSH access still works before closing the session.
- Synchronize the clock and define backup and log retention policies.
Example initial maintenance on Ubuntu/Debian:
sudo apt update
sudo apt upgrade
sudo apt install unzip ca-certificates
Expose only the services you need. The landing page usually needs HTTPS on TCP 443; TCP 80 can be used for redirects and certificate validation. The administration panel does not need to be exposed to the Internet. Public inbound SMTP is unnecessary if Gophish submits mail to a local or external service and the VPS will not receive email.
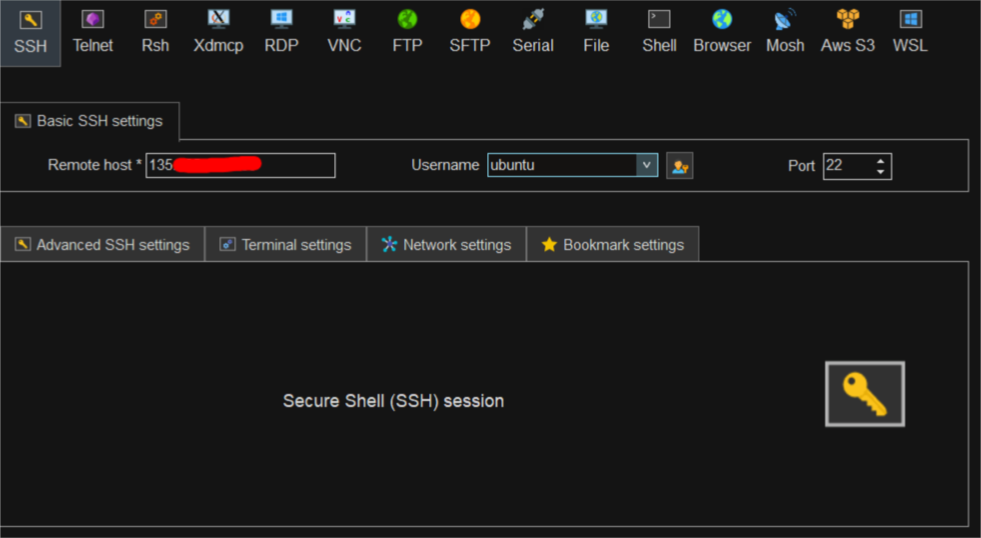
Applications such as MobaXterm can simplify this process, especially when managing multiple campaigns.
4. Register the Domain and Point the Website at the VPS
Register a domain dedicated to the exercise through a registrar such as Nominalia. Check availability, renewal terms, ownership, and administrative access. Enable MFA and retain control of the domain for as long as campaign links might remain in circulation.
Before editing records, check the authoritative nameservers. Buying the domain through Nominalia does not necessarily mean that Nominalia hosts its DNS: if the nameservers point to another provider, edit the zone there.
In Nominalia’s control panel, the documented path starts with the domain, then DOMINIO Y DNS → Gestionar DNS → Editar Zona DNS (Domain and DNS → Manage DNS → Edit DNS Zone). Add the record and save the change. Menu labels may vary with the interface.
For a landing page on a subdomain:
| Type | Name within the example.org zone | Illustrative value | Purpose |
|---|---|---|---|
| A | campana | 203.0.113.10 | Points campana.example.org at the VPS. |
| A | mail | 203.0.113.10 | Identifies the server if the VPS will send email directly. |
You do not need to point every record at the VPS. Keep records for other services, and do not publish an AAAA record unless the service also works over IPv6.
The TTL controls how long resolvers can cache a response. During setup, you can use a moderate value supported by the provider, such as 600 seconds; lowering it does not remove responses already cached under the previous TTL.
Once the name resolves correctly, configure a valid TLS certificate for the landing page and its renewal. The domain identifies the service; the certificate protects the HTTPS connection. Neither authenticates email on its own.
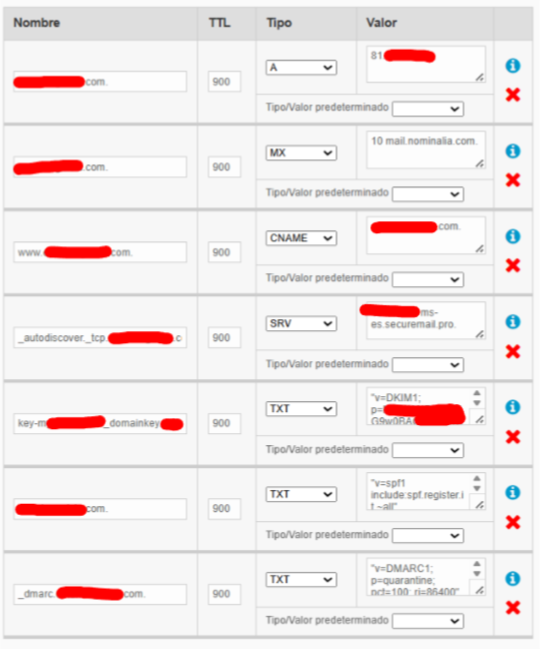
Example of a record in Nominalia:
5. Install and Isolate Gophish
Download the package for your operating system and architecture from the official Gophish releases. Review the version, release notes, and available integrity checks. Extract the complete package and keep its resources alongside the executable.
In config.json, explicitly configure the administration panel to listen on 127.0.0.1:3333. For the landing page, you can use an unprivileged local port behind a reverse proxy that handles HTTPS. Run Gophish under a dedicated service account and restrict access to configuration, the database, and keys.
Manage the process through a service with the correct working directory, controlled restarts, and protected logs. Verify access and change the initial password before operational use.
To administer it through an SSH tunnel from your computer:
ssh -N -L 3333:127.0.0.1:3333 operador@203.0.113.10Then open the panel at 127.0.0.1:3333, using HTTP or HTTPS according to admin_server.use_tls. Tunnel traffic is encrypted over SSH. Do not put passwords in scripts or command lines.
6. Choose How Email Will Be Sent
There are two common architectures, and the choice determines the DNS records:
| Aspect | Postfix on the VPS with direct delivery | External SMTP service |
|---|---|---|
| Gophish submits to | A restricted local SMTP server. | The provider’s authorized SMTP host. |
| IP seen by the recipient | The VPS’s public IP. | The provider’s infrastructure. |
| SPF | Authorizes the VPS’s sending IP. | Uses the values specified by the provider. |
| DKIM signing | Performed by a signer integrated with Postfix, such as OpenDKIM. | Performed by the provider after domain verification. |
| PTR and IP reputation | The operator’s and VPS provider’s responsibility. | Mainly managed by the sending service. |
With Postfix, configure the server identity, relay restrictions, and DKIM signer integration. If Gophish and Postfix run on the same VPS, you can restrict local submission to loopback. The server must not allow anonymous relaying from the Internet.
With an external service, verify the domain, configure the required authentication, and confirm that its terms permit this type of simulation. The landing page’s A record can still point at the VPS even if all email is sent through another provider.
7. Email DNS: SPF, DKIM, and DMARC, Step by Step
This is not a matter of “passing DNS keys to the domain.” You publish specific records in its DNS zone and configure the sending server so that messages match those records.
7.1. SPF: Which Server Can Send
SPF authorizes servers for the SMTP envelope sender’s domain, usually visible as Return-Path after delivery. It does not directly validate the sender displayed by the email client.
If the VPS were the only sender for example.org, an example would be:
Type: TXT
Name: @
Value: v=spf1 ip4:203.0.113.10 -all
ip4 authorizes that address; -all indicates that other sources are not authorized. The receiver decides how to handle the result. Use this policy only after identifying every legitimate sender.
There must be only one SPF record per DNS name. If one already exists, integrate the required senders into it. With an external service, use its official configuration, including any records for a custom bounce domain; do not authorize the VPS IP if it does not send mail. SPF limits DNS-lookup-causing terms to ten during evaluation.
7.2. DKIM: Who Signs and What Gets Published
DKIM adds a cryptographic signature to the message. The sending server signs with a private key; the recipient retrieves a public key from DNS to verify it. The private key is never published or copied to the registrar.
To configure it with your own SMTP server:
- Generate the key pair in the DKIM signer; for RSA, use at least 2048 bits.
- Choose a selector, such as
simulacion, to identify that key. - Configure the signer for
example.organd that selector, restricting access to the private key. - Connect Postfix to the signer and ensure that mail received from Gophish passes through it.
- Publish the corresponding public key in DNS.
- Send a test and check both the presence of the signature and its validation at the destination.
An illustrative record would be:
Type: TXT
Name: simulacion._domainkey
Value: v=DKIM1; k=rsa; p=<BASE64_PUBLIC_KEY>
The resulting fully qualified name must be simulacion._domainkey.example.org. If the panel automatically appends the domain, enter only simulacion._domainkey to avoid duplicating it.
The p= field contains the complete public key without PEM headers. Some tools export a zone record with parentheses, comments, and quoted strings: in a panel that asks for the TXT value, enter the logical content of those concatenated strings without copying the zone-file wrapper. Do not truncate the key or remove internal characters such as +, /, or =.
If you use external SMTP, the provider may request a TXT record or one or more CNAME records delegating its selectors. Follow its exact values; do not combine one provider’s records with another’s keys.
Publishing the TXT record does not enable signing. The sender must also be configured to sign. In a signed message, DKIM-Signature contains a domain in d= and a selector in s=; the receiver looks up the key at s._domainkey.d.
7.3. DMARC: Connecting Authentication to the Visible Sender
DMARC checks that the visible From domain aligns with a domain that passed SPF or DKIM. Either aligned mechanism is sufficient to pass DMARC; operationally, both should work.
An initial monitoring policy for a new domain would be:
Type: TXT
Name: _dmarc
Value: v=DMARC1; p=none; rua=mailto:dmarc@example.org
p=none allows monitoring without requesting quarantine or rejection under DMARC; it does not require the receiver to deliver the message. rua requests aggregate reports at a mailbox you must set up. After validating all senders, assess quarantine or reject. Do not weaken an existing policy to make a test work.
For example, with From: formacion@example.org, a valid DKIM signature with d=example.org is aligned. A valid signature using only the provider’s domain is insufficient if SPF also fails to provide alignment with the visible sender.
7.4. MX and PTR: Different Roles
MX specifies where the domain receives email. It does not authorize sending and does not have to point at the VPS. If you need to receive replies, bounces, or reports, configure the MX records for the service that will handle those mailboxes. Point an MX at the VPS only if you have actually prepared it to receive mail.
PTR is reverse DNS for the IP address. For direct delivery, ask the VPS provider to configure a consistent PTR, such as 203.0.113.10 → mail.example.org, and check that the A record for mail.example.org returns that IP. Keep the name announced by SMTP consistent as well. PTR is managed through the IP block owner, not by adding a TXT record at the registrar.
7.5. Record Summary for Direct Delivery
This table assumes that the VPS is the only sender, signs with DKIM, and uses example.org as its envelope sender domain. It is not a universal configuration for an external service.
| Type | Name | Illustrative value |
|---|---|---|
| A | campana | 203.0.113.10 |
| A | mail | 203.0.113.10 |
| TXT | @ | v=spf1 ip4:203.0.113.10 -all |
| TXT | simulacion._domainkey | v=DKIM1; k=rsa; p=<BASE64_PUBLIC_KEY> |
| TXT | _dmarc | v=DMARC1; p=none; rua=mailto:dmarc@example.org |
| MX | @ | The servers of the service that receives email. |
Configure PTR separately through the VPS provider. The mailboxes mentioned must exist in the chosen receiving service.
8. Validate DNS and Delivery Before Creating the Final Campaign
With dig available, check that records have been published:
dig NS example.org +short
dig A campana.example.org +short
dig TXT example.org +short
dig TXT simulacion._domainkey.example.org +short
dig TXT _dmarc.example.org +short
dig MX example.org +short
dig -x 203.0.113.10 +short
Also query an authoritative server when you need to distinguish a publication error from a stale cache. Then send to controlled test mailboxes and open the received message’s original headers.
Look for receiver results such as spf=pass, dkim=pass, and dmarc=pass in Authentication-Results. Check the associated domains: a standalone pass does not demonstrate alignment.
| Symptom | What to check |
|---|---|
| The landing page does not load | A/AAAA resolution, firewall, proxy, and certificate; test the complete campaign link. |
| SMTP rejects the connection | Host, port, authentication, TLS, and provider restrictions. |
| SPF fails | Actual sending IP, envelope domain, and duplicate or incomplete SPF records. |
| DKIM is missing | SMTP is not signing, or the message does not pass through the signer. |
| DKIM fails | Selector, domain, published key, or changes made after signing. |
| DMARC fails | SPF/DKIM alignment with the From domain. |
| Everything passes, but the message lands in spam | Reputation, content, and receiver policies; also review SMTP diagnostics. |
SPF, DKIM, and DMARC authenticate domains; they do not guarantee inbox placement. If the exercise requires exceptions in security controls, agree on and document them with the defending team, because they change what is being measured.
If you use Postfix on the VPS, first send a message to an authorized test mailbox. swaks displays the SMTP conversation and helps identify connection, rejection, or TLS errors:
swaks --server 127.0.0.1 --port 25 \
  --from formacion@example.org --to prueba@example.net \
  --header 'Subject: SMTP delivery test' \
  --body 'Test message for the authorized simulation.'
You can also check delivery through the local MTA with mail:
printf '%s\n' 'Test message for the authorized simulation.' | \
  mail -r formacion@example.org -s 'SMTP delivery test' prueba@example.net
9. Build the Campaign in Gophish
Sending Profile
In Sending Profiles, configure the authorized sender and chosen SMTP server. Use authentication and TLS as required by the service, and keep certificate validation enabled. Fix TLS errors rather than hiding them with Ignore Certificate Errors.
Use Send Test Email to check the profile. The From domain must match the validated authentication design; you do not create a DNS record for each individual email address.
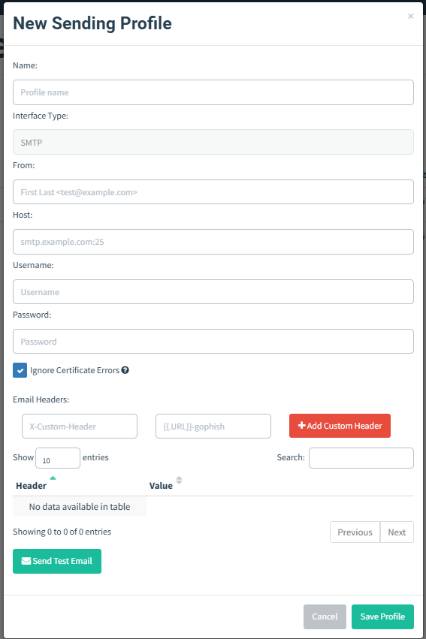
If you use Postfix on the VPS, point the profile at your SMTP server: localhost:25.
Template and Landing Page
In Email Templates, create the subject and content for the agreed scenario, with readable content and controlled resources, in plain text or preferably HTML. Use the {{.URL}} variable for the campaign link. This ensures that the link takes participants to the landing page selected when creating the campaign.
In Landing Pages, prepare a simulation page. Password capture is usually left disabled unless the campaign’s scope permits it, and forms requesting secrets should be avoided. If you record another interaction, collect only the necessary data.
Test through a pilot campaign: official Gophish links use a rid identifier, or token depending on the version, to load the corresponding landing page. Visiting only the server’s root can return a 404 even when the deployment is working.
Participants and Launch
In Users & Groups, import only the authorized list and check for duplicates. Start with a small test group.
In Campaigns, select the template, landing page, sending profile, and groups; set the URL to the landing page’s public HTTPS address. Review the date, time, and time zone before launching.
Launch Date sets the start, and Send Emails By spreads sending until the specified time. The latter is not the campaign’s closing date, nor does it guarantee an exact hourly quota on its own: verify the actual sending rate and SMTP restrictions. For example, sending to 2,000 employees at 200 emails per hour requires 10 hours. A window from 8 a.m. to 8 p.m. would leave additional room, but you still need to verify the actual rate.
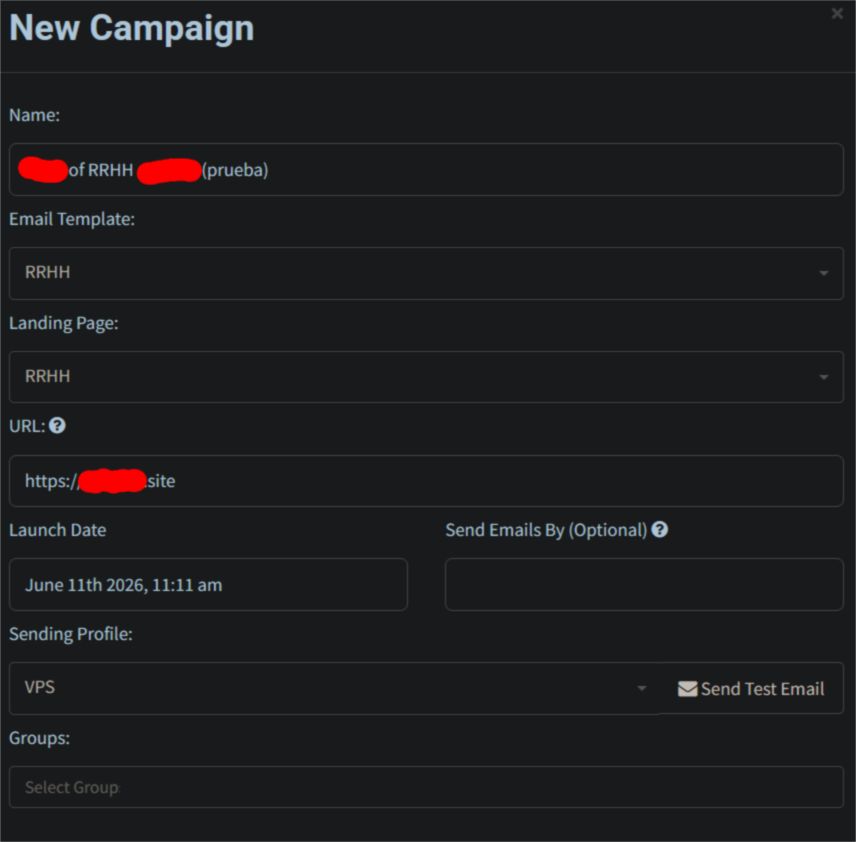
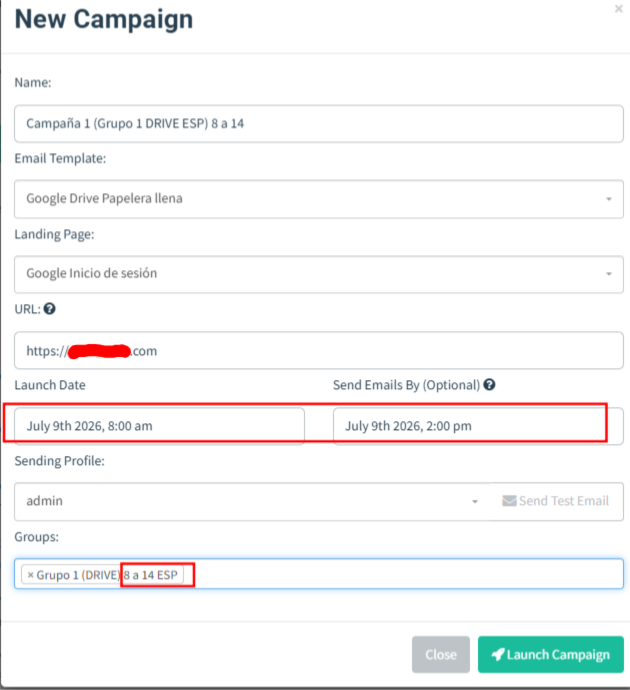
10. Run, Monitor, and Analyze
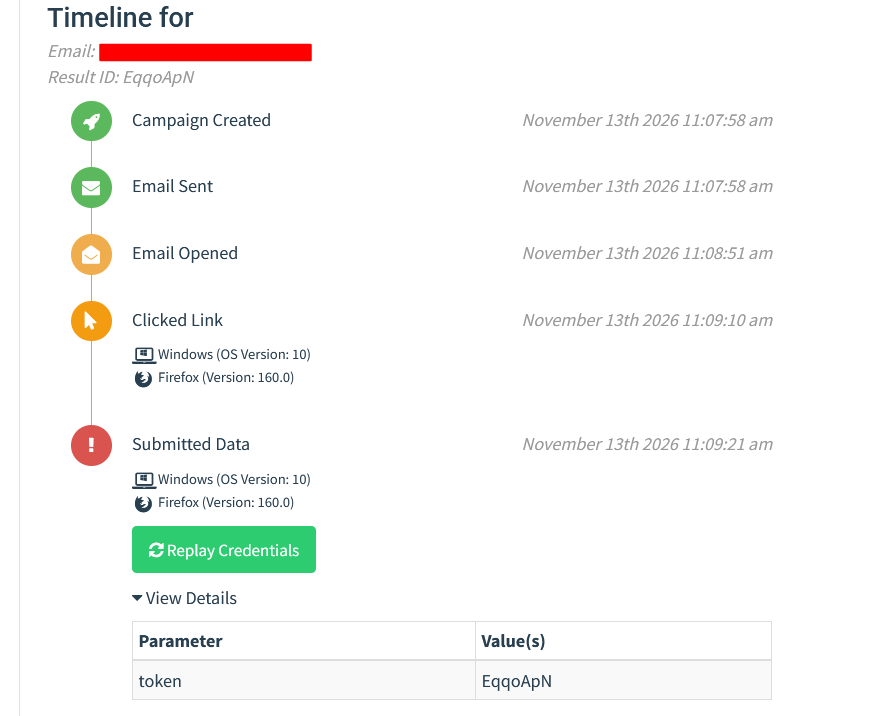
During the pilot, check the complete journey: receipt, link, HTTPS, landing page, event, and educational content. During the main send, monitor errors, bounces, and availability, and apply the stop conditions if a problem arises.
Do not automatically interpret every open or click as a human action. Email scanners may visit links, and privacy mechanisms may load images. A click without a preceding open does not prove that it came from a bot either.
Analyze timing, events, and environmental evidence together. Classify automation as probable when there are supporting signs, and preserve uncertainty in the report.
| Metric | Interpretation and limitations |
|---|---|
| Messages accepted by SMTP | Do not necessarily equal inbox delivery. |
| Recorded opens | Affected by image blocking and automatic loading. |
| Participants who clicked | Count unique people and review possible automated visits. |
| Reports to the security team | Collect them through the reporting channel; they may not appear in Gophish. |
| Time to first report | Measures one part of response capability. |
| Landing page interactions | Interpret according to the objective, without collecting credentials. |
Define the denominator for each percentage. For example, “unique participants who clicked / included recipients” differs from a rate calculated using verified deliveries. Include limitations when delivery cannot be confirmed.
11. Close the Campaign and Decommission the Infrastructure
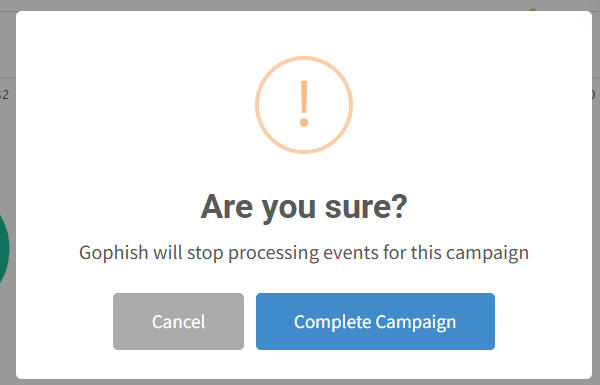
At the end of the observation period, complete the campaign and export the necessary results. The report should explain the objective, scope, incidents, metrics, limitations, and improvement actions, using aggregated results without publicly identifying participants.
Technical closure is part of the work too:
- Stop pending sends and check SMTP queues.
- Remove the landing page or replace it with an exercise-ended notice.
- Revoke temporary credentials and access when they are no longer needed.
- Remove sending permissions and obsolete records according to the agreed plan.
- Retain or delete the database, CSV files, logs, and backups according to the defined retention period.
- Remove DNS references to the VPS before releasing its IP, and decide how long to retain the domain.
A useful campaign ends with concrete improvements: a clearer reporting channel, adjustments to response procedures, or targeted training. These findings inform the next exercise and help assess whether the organization is improving.
Campaign Proof of Concept
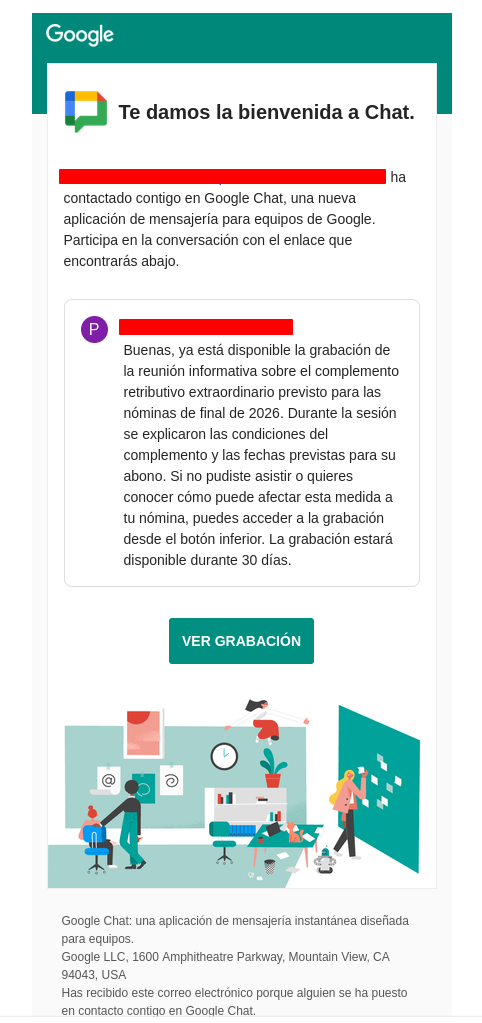
A brief look at a Google Chat-themed campaign:
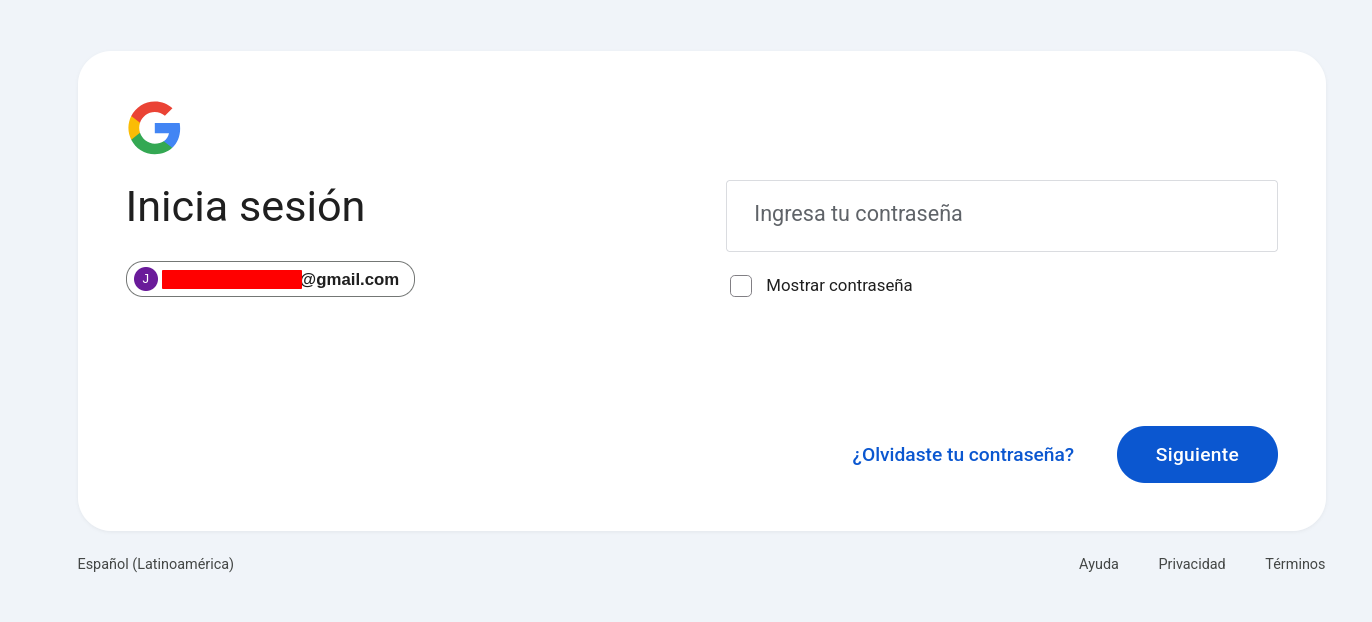
Would you notice any differences from Google’s login page?
Technical References
- Gophish: installation and configuration.
- Gophish: sending profiles.
- Gophish: landing pages.
- Gophish: campaigns and scheduling.
- Nominalia: accessing and editing the DNS zone.
- Nominalia: SPF, DKIM, and DMARC. Its automatic configuration applies to its own email service; other senders require their own values.
- RFC 7208: SPF.
- RFC 6376: DKIM.
- RFC 9989: DMARC.